Are you looking for the best telescope for astrophotography? If yes, you’re in the right place because nothing beats the close-up sight of stars and other terrestrial objects in the night sky.
The breathtaking sight isn’t just informational, but also unimaginable. The visual treats allow you to watch amazing space images, with the ability to focus on a cluster or just a few stars. It’s also possible to track and find specific terrestrial objects such as planets or the moon.
Optical telescopes capture images of celestial objects you can frame and use as wall artwork in your home to showcase your love for astronomy. However, some telescopic technologies can create detailed images only professional astronomers may find useful.
The telescope has become a critical scientific instrument and an icon of science after four centuries since its inception. The instrument of thought extends human senses, and has altered how we perceive not just the universe, but humans at large over its 400-year history.
Galileo Galilei made his own telescope in just a day after word reached him (a year later) that Hans Lippershey patented his invention. He made it clear that the universe was much larger than had been thought, and the space humans take up is just a small portion of it, in contrary to previous imagination.
Today, the best telescope under 200 are better than Galileo’s and provides better crisp views of celestial objects. However, a replica of his telescope goes for a lot more. You can see all that Galileo saw with his telescope and more with just a standard pair of binoculars.
The iconic value of the best telescope for viewing planets was earth-shaking during the instrument’s initial invention, and still continues to do so. Just like science, telescopes have redefined the appearance of the universe over the previous 400 years.
It’s also necessary to learn about the best telescopes, including how they work, to understand what you can view through them. It’s only then that the instruments extend your senses and minds.
The collective human imagination was spurred by space since early times. This led to unearthing of heavenly bodies’ secrets and space exploration. However, unmanned space probes are responsible for exploring space today.
For instance, The Hubble Space Telescope, one of the best telescope for viewing planets, has captured thousands of images of terrestrial objects over the last couple of decades. With the images, it has been possible to approximate the age of the universe and provide evidence of dark energy being in existence.
Although space telescopes get clearer shots of galaxies and exploding stars, the discoveries come at a cost. As an example, the Hubble project cost about $1.5 billion to launch into space in 1990. The costs of maintenance are also high.
Whether you’re a hobbyist or professional astronomer, this is where advanced optical telescopes come in to provide similar stargazing capabilities at significantly lower costs. For instance, the best telescope under 500 has the features you need to view celestial objects from your balcony or yard each night.
The best telescope for astrophotography makes it possible to view distant objects you can’t see with your naked eyes. They also use photographic films such as photometers or electronic detectors such as CCD detectors to record light over long periods.
What’s more, their superior resolution makes it possible to discern fine details, something eyes can’t do. Other benefits of the best telescopes include the ability to reach extremely far locations in the universe. They’re easy to use, affordable and easily accessible due to high availability on the market.
Automated telescopes also offer the ability to track terrestrial objects, support ease of scheduling and increases productivity. Whether you’re looking for the best telescopes for beginners or one with advanced features for stargazing, there’s one out there for you.
Our Recommendations
Best Product Category 1
Winner
The Celestron NexStar Computerized Telescope

OUR RATING
Celestron is a leading manufacturer of telescopes. It makes a wide range of telescopes for users at varying experience levels. The brand was invented over 5 decades ago and has continuously improved its products over the years.
The Celestron NexStar 8SE Telescope is an advanced computerized telescope. It automatically finds and tracks over 40,000 terrestrial objects just at the tap of a button. The aperture is 8 inches large with a high capability of collecting light. It’s the instrument you need to enjoy stargazing deep into space.
It’s available in varied options with smaller apertures (4-inch and 6-inch) at lower price points. However, they offer the same view. What makes this specific telescope unique is the ease with which you can study specific details of celestial objects you desire.
It comes with various accessories to enhance your stargazing experience. They include a filter kit, an eyepiece, a phone scope adapter and 14 other accessories you’ll find handy. With the scope adapter for phones, capturing images of celestial objects of interest is made easy.
Designed for both experienced and beginner users alike, opt for it if you want an automated telescope for deep sky stargazing. It delivers spectacular views of planets and the moon.
PROS & CONS
PROS
- It has high light collecting capability
- Auto aligns to track celestial bodies
- Comes in a unique design and with a sturdy tripod
- It’s easy to dismantle for easy portability
- It’s also easy to setup or assemble
CONS
- The telescope is expensive, especially for beginners or hobbyists
Runner Up
Orion SkyQuest Plus Debsonian Telescope

OUR RATING
Orion is also a big name in the astronomy industry of telescopes. The SkyQuest XT8 Plus Telescope has a distinct yet attractive look. According to the company, the instrument is easy to use due to its outstanding Dobsonian design.
The Newtonian telescope is an advanced or upgraded version of the previous model. Unlike the predecessor, it has more new features and supports use of various accessories. The DeepMap 600 folding star chart and Safety Film Solar Filter make it easy to explore the sky to view desirable objects.
The focuser and base have been redesigned for enhanced for better accuracy. The 8-inch parabolic primary mirror gathers lots of light, making the Dobsonian telescope ideal for viewing deep space celestial objects such as nebulas and galaxies.
Opt for this telescope if you’re an experienced hobbyists looking for the best telescope for viewing planets deeper into the skies without digging deeper into your pocket. It’s attractive, functional and durable for long-term hobbyist use.
PROS & CONS
PROS
- It’s easy to use due to its Dobsonian design
- It comes with various features and accessories for increased functionality
- High end telescope for serious hobbyists
- The metallic blue optical tube is eye catching
- The secondary mirror is adjustable for easy alignment
- Focus adjustments are accurate for clear views
- Reasonably-priced, but may still be costly for beginners
CONS
- Although the telescope has many features, those that support serious astronomy are limited
Alternative
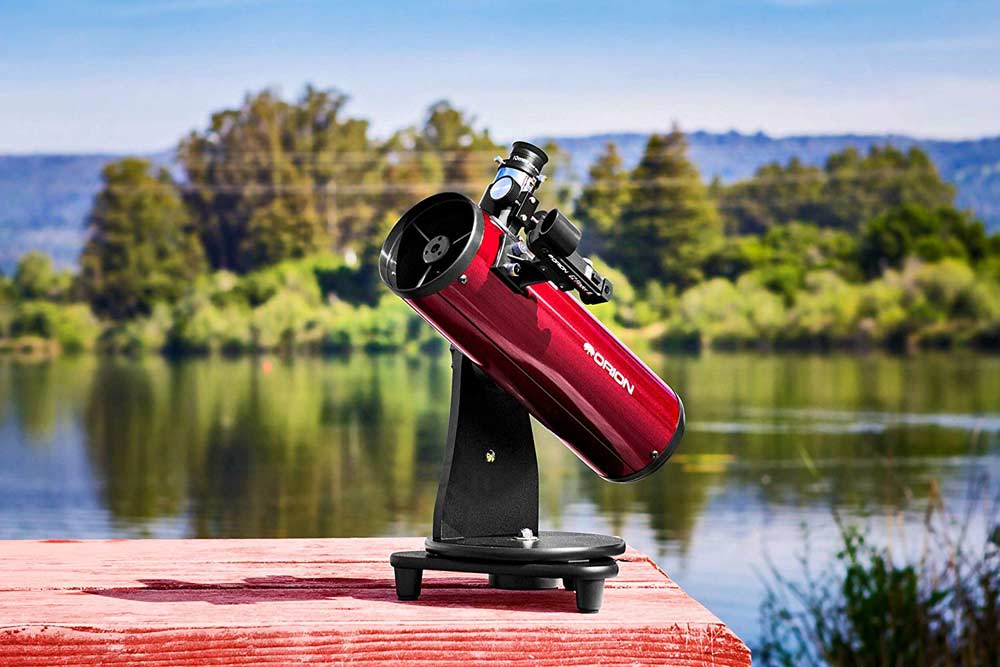
Orion 10012 Skyscanner Reflector Telescope

OUR RATING
Orion is a top telescope brand, hence we’ve featured it in this list twice. The Skyscanner 10012 Telescope is built for entry-level use. Designed for tabletop use, you can easily travel around with it for picnics or simply watch the stars from your garden or backyard.
The eyepieces measure 1.25 inches in diameter, enough to collect light view objects in the sky. It also comes with an astronomy software to help you understand how the instrument works, making it one of the best telescopes for beginners. With the Orion EZ Finder II reflex sight, you can easily target the objects you want to view or capture.
Unless the skies are clear with little to no light pollution, don’t expect to use this telescope for viewing objects lying deep into space. However, it gives view of bright objects such as the moon and planets close-by. Unlike most telescopes for entry-level use, this instrument isn’t made of plastic for increased durability.
Opt for this instrument if you want the best telescope under 200 that’s built for durability and ease of use. It’s ideal for watching the lunar system.
PROS & CONS
PROS
- Compact and highly portable
- Ideal for beginner or entry level users
- Built for ease of setup and use
- It’s easy to adjust and aim at target objects
- Sturdy, premium and has quality feel unlike most beginner instruments
CONS
- Not compatible with tripods or mounts
- Doesn’t give view of deep sky objects
Best Product Category 2
Celestron AstroMaster Newtonian Telescope

OUR RATING
Celestron is a leading telescope manufacturer with various devices designed to meet the unique needs of consumers worldwide. Therefore, we’ve featured it twice in this list.
The Celestron AstroMaster Reflecting Telescope is one of the best telescopes under 500 on the market. It comes in a sturdy and large build to offer unmatched stargazing experience. Easily dismantle it into different parts for easy transportation and portable use to stargazing events and camping sites.
It comes with a StarPointer red dot finder scope, two eyepieces of 10 mm and 20 mm, and an astronomy software to help you understand how to setup the telescope and use it. Auto track objects across the sky in crisp, sharp images due to the equatorial mount the instrument uses.
Whether you want to view star clusters, planets, the moon or any other celestial object, you’ll find this telescope handy. It’s ideal for use on the go when you go camping.
PROS & CONS
PROS
- It comes in a solid, stable and sturdy design
- It’s easy to setup and use
- Easy to adjust accurately
- The compact design and light weight allows for portability
- Backed with a 2-year warranty
- The telescope is affordable for beginner and intermediate use
- It’s powerful for great performance in viewing sharp images
CONS
- Not ideal for advanced serious astronomy
Why You Should Choose the Best Telescope for Viewing Planets Carefully
Telescopes are a great way to gaze into the skies and beyond. They come built with various features to make stargazing possible and fun. They range in in prices from the best telescope under 200 to those that cost thousands of dollars. The instruments are also made for varying user levels.
With hundreds of manufacturers out there, all claiming to be the best, the need to choose the right product goes without saying. Choosing the right telescope means you get the right features in a device that’s reasonably priced.
It also ensures that you buy a telescope with features you’re bound to use. The best telescope isn’t just functional and durable, but designed to make your stargazing sessions like no other. A telescope is a long-term investment so you want to make sure that your choice is right.
Determining the celestial objects you want to target is also key to finding the right telescope. Whereas some people are fascinated by stars or planets, others are into objects placed deep into the skies. For others, staring into space is just amazing!
Factors to Consider When Choosing the Best Telescope for Astrophotography
Are you shopping for your first telescope or your 10th? It’s important to understand what telescopes are and how they work for a rewarding stargazing experience.
Whether you’re looking for the best telescope for kids to keep them busy over the weekends and holidays, or simply want a more advanced instrument to take your hobby or profession a notch higher, there’s something for you.
Here’re factors to consider when shopping for the best telescope for viewing planets:
Type of Telescope
Choose from refractor, compound or reflecting telescopes depending on your unique needs. Compound telescopes come in compact designs, making them ideal for portable use on the go. Refractors are the best for high contrast images, making them ideal for observing double stars and planets with great details.
Refracting telescopes require minimal maintenance without the need to align or recoat mirrors because they use lenses. Small refractors mountable on sturdy camera tripods are also portable for easy use on the go. With reflecting telescopes, there’s no chromatic aberration or excess color along the fringes of images.
Reflecting telescopes are also less costly and available in larger apertures (6 inches or more) and designs. The same applies to compound telescopes. Select the right type of telescope accordingly.
1. Mounts
Telescope mounts or stands support the instruments while in use, eliminating the need to hold them. A mount can be used in the following ways:
- Pointing the telescope at distant objects or birds
- Stabilizing the telescope ready for use
- Adjusting the telescope to star movements due to rotation of the Earth
- Frees the hands for engagement in other tasks such as changing the eyepieces, focusing, drawing, note-taking, etc.
The two major types of telescope mounts include the following:
i) Equatorial mounts
ii) Alt-azimuth mounts
The alt-azimuth mount feature horizontal and vertical rotation axes. A telescope is rotated along the azimuth axis (horizon) to the horizontal positioning of a distant object and then tilted along the altitude axis of the vertical position of the object to point the instrument at it.
The Alt-azimuth mount is commonly used in affordable telescopes because it’s easy to use. It’s available in two variations:
- The Rocker Box – a box mount with a low center of gravity (COG). It’s often made from plywood, and features Teflon bearings for the altitude axis and azimuth axis on the horizontal round base. Featured on Dobsonian telescopes, the mount offers great support for bulky telescopes, including smooth movement without friction.
- The Ball and Socket – the alt-azimuth mount features an end shaped like a ball to freely rotate in the socket mount. It’s often used in two inexpensive telescopes with rich fields.
The mount is simple and easy to use, but doesn’t track star movements. It produces a zigzag motion instead of a smooth arc across the sky when trying to follow star movements. They’re not ideal for capturing star photographs.
On the other hand, the equatorial mount features right ascension and declination perpendicular rotation axes. The mount is tilted at a similar angle as the Earth’s rotation axis instead of up and down orientation.
The two types of equatorial mount include:
- The Fork Mount – the fork has two prongs and is built onto a wedge aligned with the pole of the Earth. The fork’s base is a single rotation axis while the prongs the other axis of rotation.
- The German Equatorial Mount – made in the shape of a letter “T,” the long axis of the letter aligns to the pole of the Earth.
Proper alignment with the Earth’s poles enables a telescope’s equatorial mount to follow the smooth star movements across the sky that resemble the motion of arcs. The mounts also feature:
- Motorized drives – enables a computer (PC, laptop or PDA) and the user to drive the telescope continuously to track the stars.
Alt-azimuth mounts move the telescope up-down and left-right. They’re intuitive and easy to setup. Equatorial mounts, on the other hand, easily motorize and move one axis.
However, they must align to the North Star Polaris to function properly. They’re also larger and bulkier than alt-azimuths. Equatorial telescope mounts are ideal for astrophotography.
Go-to telescopes feature small built-in computers in the hand control for auto-tracking of terrestrial bodies. On the converse they’re complex to setup without knowledge of how to find the sky’s bright alignment stars. If low-priced, the apertures would be smaller than those in beginner optical telescopes.
The right mount is stable and sturdy. Alt-azimuth are the simplest mounts and move telescopes right-left and up-down. Equatorial mounts integrate motors to track stars as they move across the skies.
Often used with reflecting telescopes, Dobsonian mounts are the least costly and portable. They’re ideal for reflector telescopes with aperture size of at least 16 inches. On the other hand, Go-to mounts are automatic and the most accurate.

2. Eyepieces
The only lens in a reflecting telescope and the second lens in a refractor is the eyepiece of a stargazing instrument. An eyepiece contains at least one lens and come in various optical designs. Eyepieces are like mini-telescopes.
The eyepiece is included in a telescope to do the following:
- Offers comfortable eye relief, ensuring the eyepiece and the eye have a short distance for image focus.
- Produces the magnification of a telescope while leaving room for change or adjustment.
- Produces sharp, clear images of high quality.
- Determines the apparent view field (magnification or true field) of the telescope i.e. how much of objects in the sky can be viewed.
Eyepieces are available on the market in various designs as follows:
i) Huygens and Ramsden Eyepieces – the oldest eyepiece designs experience chromatic aberration. The eyepieces are often used in the least costly telescopes with the least effectiveness.
ii) Kellner and RKE Eyepieces – RKE is a patented Kellner alteration by Edmund Scientific. The designs feature three elements and create image at 40 degrees view field. They experience some chromatic aberration and offer great eye relief. Varying from $30 to $50, the Kellner eyepieces strike a balance between economy and performance and ideal for telescopes with long focal lengths.
iii) Orthoscopic Eyepieces – invented by Ernst Abbe in 1880, the eyepieces feature four elements and create images at 45 degrees apparent narrow view field. They give a clear view, offers eye relief and used for viewing planets. They vary in price from as low as $50 to $100.
iv) Plossl Eyepieces – the design features 4 or 5 elements and create images at 50 degrees view field. Unlike short lenses at or below 10 mm, they offer proper eye relief. They’re popular and perform optimally at sizes ranging from 15 mm to 30 mm to support high quality viewing of planets. But, they experience astigmatism at the edges of the view field.
v) Erfle Eyepieces – invented during World War II, they feature five elements and create images at 60 degree view field that’s wide. However, they’re not suitable for viewing planets due to astigmatism and ghost images. They’ve been improved to feature wider view fields.
vi) Barlow Eyepieces – used with another eyepiece to increase magnification twice or thrice. It’s economical and offers good eye relief when used with an existing eyepiece. It fits into a Barlow lens for placement into the eyepiece holder to increase magnification.
vii) Nagler Eyepiece – invented in 1982, they feature seven elements and create images at 82 degrees view field angle. The eyepieces are costly, weigh up to 2 pounds (making them heavy) and feature barrel sizes of 2 inches only.
viii) Illuminated Reticle Eyepieces – available in various designs, they’re ideal for astrophotography. The eyepieces guide the telescope to track a terrestrial object under film exposure that goes for about 10 minutes to 60 minutes.
Choose the right eyepiece and power level based on your intended application and what you want to view. High power eyepieces show details in small clusters while low power variations make it easy to find terrestrial objects and keep them in view. They’re also ideal for viewing dimmer objects because they require less light.

3. Aperture
Aperture is a primary lens’ or mirror’s diameter. The former is fixed in the front of the tube while the latter goes at the back of the tube. Large apertures allow more light inside the telescope. However, increased light collection could result in blurry images and more visible details and magnification power.
Apertures typically range from 50 mm to 400 mm or 2 inches to 16 inches. Optical tubes available in the market can be as large as 16 inches. Apertures are the most important telescope specification. It influences image brightness, and the telescope’s weight and price.
A backyard telescope could range in aperture size from 80 mm (3.15 inches) to 300 mm (12 inches) while a professional telescope could have an aperture as large as 10 meters (400 inches), the size of a small fish pond.
The higher the surface area of a mirror or lens, the more light a telescope collects. The surface area of the mirror relates to an aperture square. This means that a telescope with a 200 mm aperture mirror gathers up to four times more light as one with 100 mm aperture.
The weight and cost of the mirror or lens could even be higher than the aperture’s square. Therefore, such telescopes are heavy, big and costly, explaining why most skygazers don’t have one (such as a 35” Dobsonian reflecting telescope).
The aperture of a telescope should be at least 2.8 inches or 70 mm. large apertures give impressive views and creates images of objects deep into the skies with great detail. However, small scopes can spot multiple galaxies from dark locations than urban areas.
Large apertures collect lots of light, resulting in clear images. Be wary of telescopes marketed by their magnification power alone. High magnification should be accompanied with a large aperture.
4. Focal Length
Mirrors and lenses collect light then focus it to a point. The distance from the light gathering point to the focus point is the focal length, f. A collection of lenses making up an eyepiece also have a focal point. Real distant object images are actually visible at the focal plane.
A telescope’s mirror or objective lens’ focal length affects the instrument’s general length. A smart optical layout can be used to squeeze a long focal length into a compact optical tube.
5. Focal Ratio
The focal ratio is the result of dividing the focal length by the aperture size. It’s written as F1, F5, F10, etc. Optical tubes with high focal ratios deliver light to the eyepiece in a parallel way than those with low focal ratios. How the eyepiece handles the light becomes important.
A high focal ratio of at least F10 results in a high quality image displayed across the view field through the eyepiece. A long focal ratio results in a narrower view field and high magnification power, making it ideal for watching planets, the moon and double stars.
On the other hand, a lower focal point of F6 or lower relays light at the view field edges and to the eyepiece at a steeper angle. The result is an image that’s not evenly distributed across the view field. The lower focal ratio results in less magnification and a wider view field. With more view of the sky, it’s ideal for viewing galaxies, clusters of stars and the Milky Way.
The focal ratio also affects the brightness of elongated distant objects such as galaxies or nebula. For instance, a telescope with a lower focal ratio would display a brighter image than an instrument with a higher focal length. But, the image is smaller.
However, only aperture of a telescope affects the brightness of stars because they’re light point sources. Note that a high focal ratio doesn’t necessarily translate to a high quality image.
6. Magnification
The eyepiece at the focal plane is responsible for magnifying the terrestrial images relayed from the objective lens. Magnification is the objective lens’ focal length divided by the focal length of the eyepiece.
Eyepiece can be changed to alter a telescope’s magnification power. An eyepiece with a smaller focal length would result in high magnification. The optimal useful telescopic magnification is approximately 50 x the size of its aperture in inches. A higher figure would result in blurry or dim images.
However, unstable atmosphere can reduce the 50x to 30x or 20x the aperture size. On the converse, a steady atmosphere could raise it to 70x or even 100x, but it’s rare.
7. Resolving Power
A telescope’s resolution measures its capability to differentiate the minute details of a terrestrial object or differentiating any two close objects. It’s when separating two stars closely positioned to each other, or small details on a planet or even the moon.
Resolution is proportional to a telescope’s aperture. The practical resolution of a telescope to at least 1 is limited by atmospheric instabilities and motion.
Resolution equals 116/the size of an aperture
Accessories
Determine if you want a telescope that comes with specific accessories. You can also buy them separately. Consider a flashlight with adjustable brightness as a source of light, finder scopes, star diagonals, and binocular tripod adapters.
Other accessories include power supplies, star charts, camera adapters, filters (moon and color filters), Barlow lenses, and light pollution reduction filters, among others.

Conclusion
Being a knowledgeable buyer is key to choosing the best telescope for viewing planets. Learn more about telescopes, their various features and what’s involved in stargazing if you’re looking for the best telescope for beginners. Find a good storage and observation location before making a purchase.
Determine your specific interests in the field to help you choose the right telescope. Also determine if you want the best telescope under 200 or one that costs more. Opt for a telescope that’ll meet your needs and give you value for your money.
Order the best telescope for astrophotography on Amazon today and begin exploring the universe from your backyard.